学习 spring 有一段时间了,期间没有时间练习,现在学一下 spring5,再开始做项目
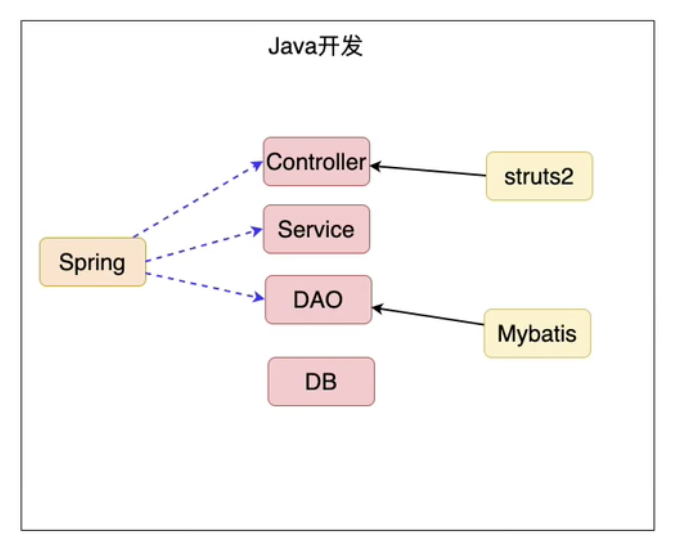
一、引言 1、EJB 存在的问题 2、什么是 Spring 是一个轻量级的 JavaEE 解决方案,整合众多优秀的设计模式
对运行环境没有额外要求
代码移植性高,不需要实现额外的借口
3、设计模式 广义:面向对象设计中,解决特定问题的经典代码
狭义:GOF4 人帮定义的 23 种设计模式:工厂、适配器、门面、代理、模板
1、工厂模式 什么是工厂模式 1 2 3 1. 概念;通过工厂类创建对象2. 好处:解耦合
简单工厂的实现 1 2 3 4 5 6 7 8 9 10 11 12 13 14 15 16 17 18 19 20 21 22 23 24 25 26 27 28 29 30 31 32 33 34 35 36 37 38 39 40 41 42 43 44 public class BeanFactory {private static Properties env = new Properties ();static {InputStream inputStream = BeanFactory.class.getResourceAsStream(".properties" );try {catch (IOException e) {finally {if (inputStream != null ) {try {catch (IOException e) {public static UserService getUserService () {UserService userService = null ;try {Class clazz = Class.forName(env.getProperty("userService" ));catch (ClassNotFoundException e){catch (InstantiationException e){catch (IllegalAccessException e){return userService;
通用工厂的设计 1 2 3 4 5 6 7 8 9 10 11 12 13 public static Object getBean (String key) {Object obj = null ;try {Class clazz = Class.forName(env.getProperty(key));catch (ClassNotFoundException e) {catch (Exception e){return obj;
通用工厂的使用方式 1 2 3 4 1. 定义类型(类)2. 通过配置文件的配置告知工厂(applicationContext.properties)3. 通过工厂获得类的对象
二、第一个 Spring 程序 1、软件版本 1 2 3 4 1.JDK1.8+
2、环境搭建 1 2 3 4 5 6 <dependency > <groupId > org.springframework</groupId > <artifactId > spring-context</artifactId > <version > 5.1.4.RELEASE</version > </dependency >
1
2
3
1. 配置文件放置没有特殊要求2. 命名:建议 applicationContext.xml3. 以后应用 spring 框架,需要进行配置文件路径的设置
3、Spring 核心 API 1 2 作用:Spring 提供的 applicationcontext 这个工厂,用于对象的创建
1 2 3 接口:屏蔽实现的差异
1 2 3 ApplicationContext 工厂的实现类会占用大量内存
4、程序开发 1 2 3 4 1. 创建类型2. 配置文件配置<bean id ="person" class ="com.lqs.basic.Person" > </bean > 3. 通过工厂获得对象
1 2 3 4 5 6 7 public void test2 () {ApplicationContext ac = new ClassPathXmlApplicationContext ("/applicationContext.xml" );Person person = ac.getBean("person" ,Person.class);
5、细节 1 2 3 4 5 6 7 8 9 10 11 12 13 14 15 16 17 18 19 1、 2. 只配置 class 属性,不配置 id 值<bean class ="com.lqs.basic.Person" /> <bean id ="" class ="" /> <bean name ="" class ="" />
6、Spring 工厂的底层实现原理(简易版) 7、思考 1 2 1. 是不是所有对象都会交给 spring 创建呢
三、Spring5.x 与日志框架整合 spring 与日志框架进行整合,日志框架就可以在控制台中,输出 spring 框架运行时的重要消息
1 spring5.默认整合 logback、log4j2
1 2 3 4 5 6 7 8 9 10 <dependency > <groupId > org.slf4j</groupId > <artifactId > slf4j-log4j12</artifactId > <version > 1.7.25</version > </dependency > <dependency > <groupId > log4j</groupId > <artifactId > log4j</artifactId > <version > 1.2.17</version > </dependency >
1 2 3 4 5 6 7 log4j.rootLogger = debug.console log4j.appender.console =org.apache.log4j.ConsoleAppender log4j.appender.console.Target =System.out log4j.appender.layout =org.apache.log4j.PatternLayout log4j.appender.ConversionPattern =%d{yyyy-MM-dd HH:mm:ss} %-5p %c{1}:%L - %m%n
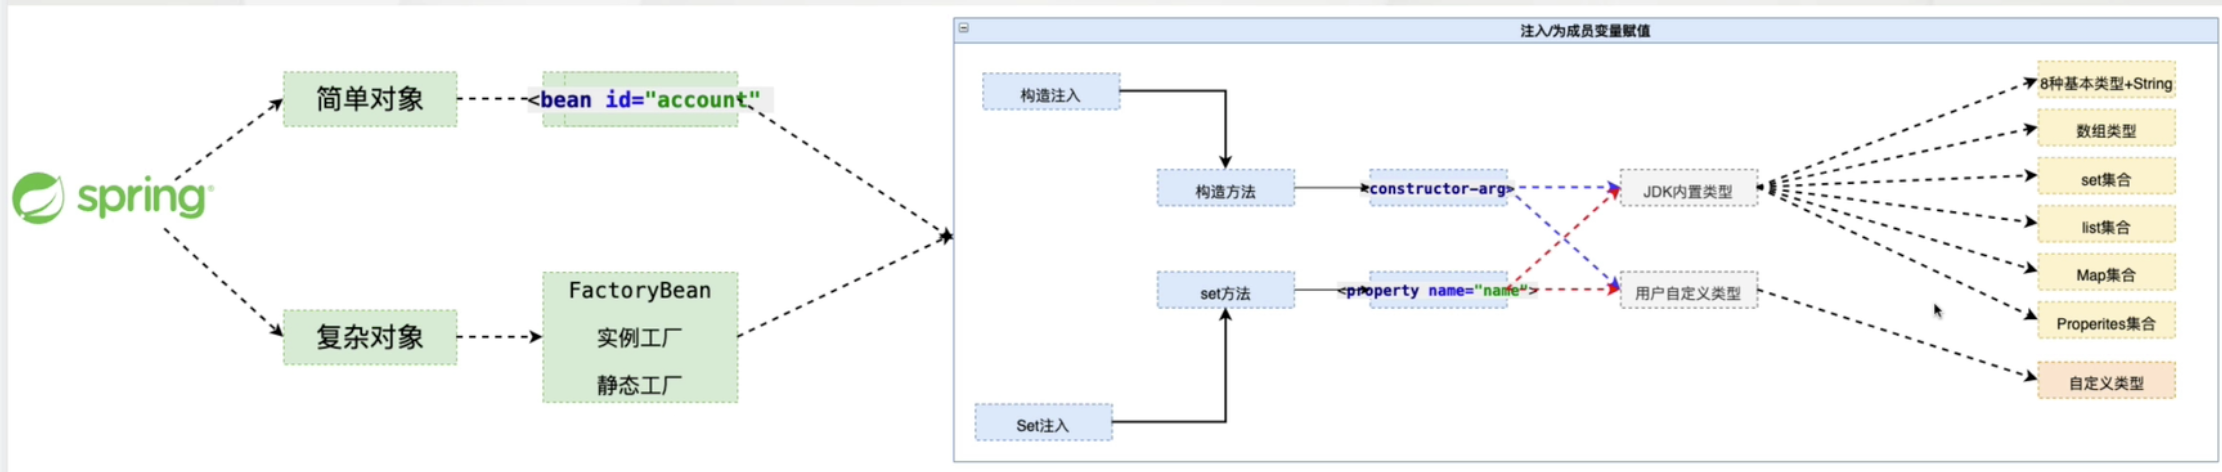
四、注入(Injection) 1、什么是注入 1、为什么需要注入 通过编码的方式会存在耦合
person.setName(“lqs”);
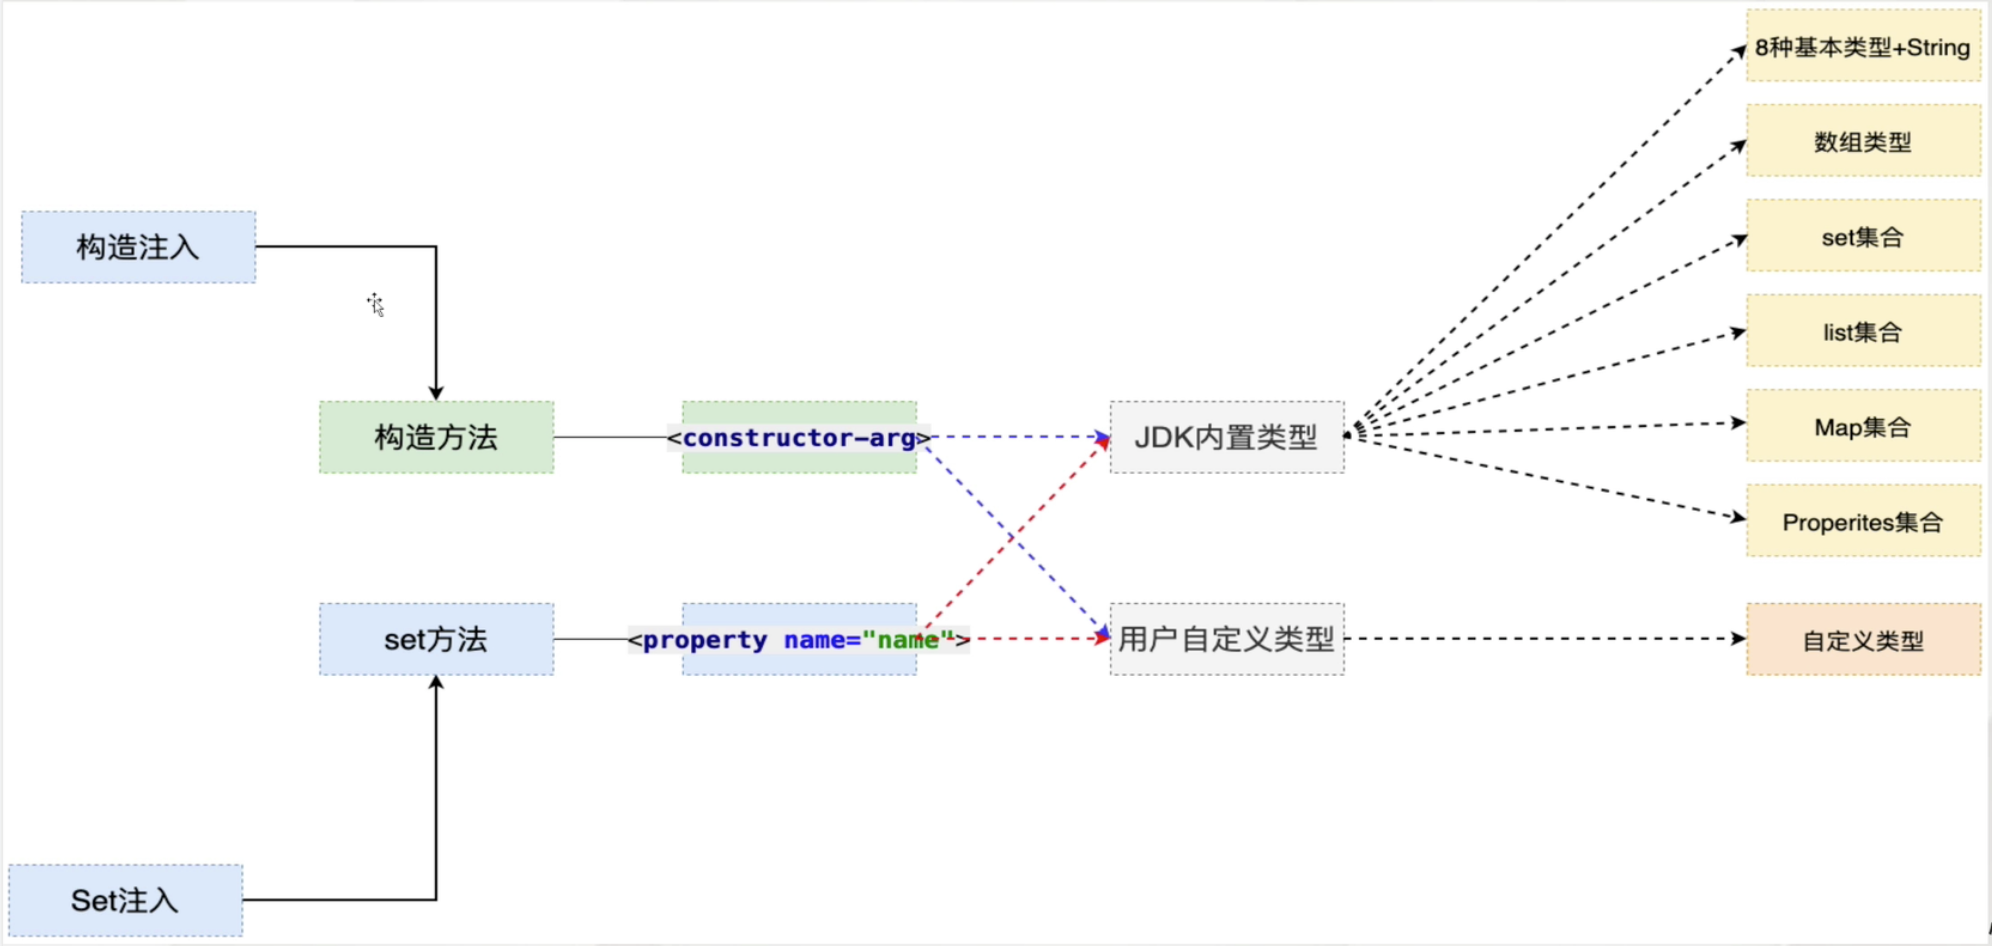
2、如何注入 类成员变量提供 set 方法 spring 配置文件 1 2 3 4 <bean class ="com.lqs.basic.Person" > <property name ="id" value ="" /> <property name ="name" value ="" /> </bean >
3、好处 2、Spring 注入的原理分析 1 2 1 . <bean class= "com.lqs.basic.Person" > = = Person p = new Person()2 . <property name= "id" value= "lqs" > = = p.setName("lqs" )
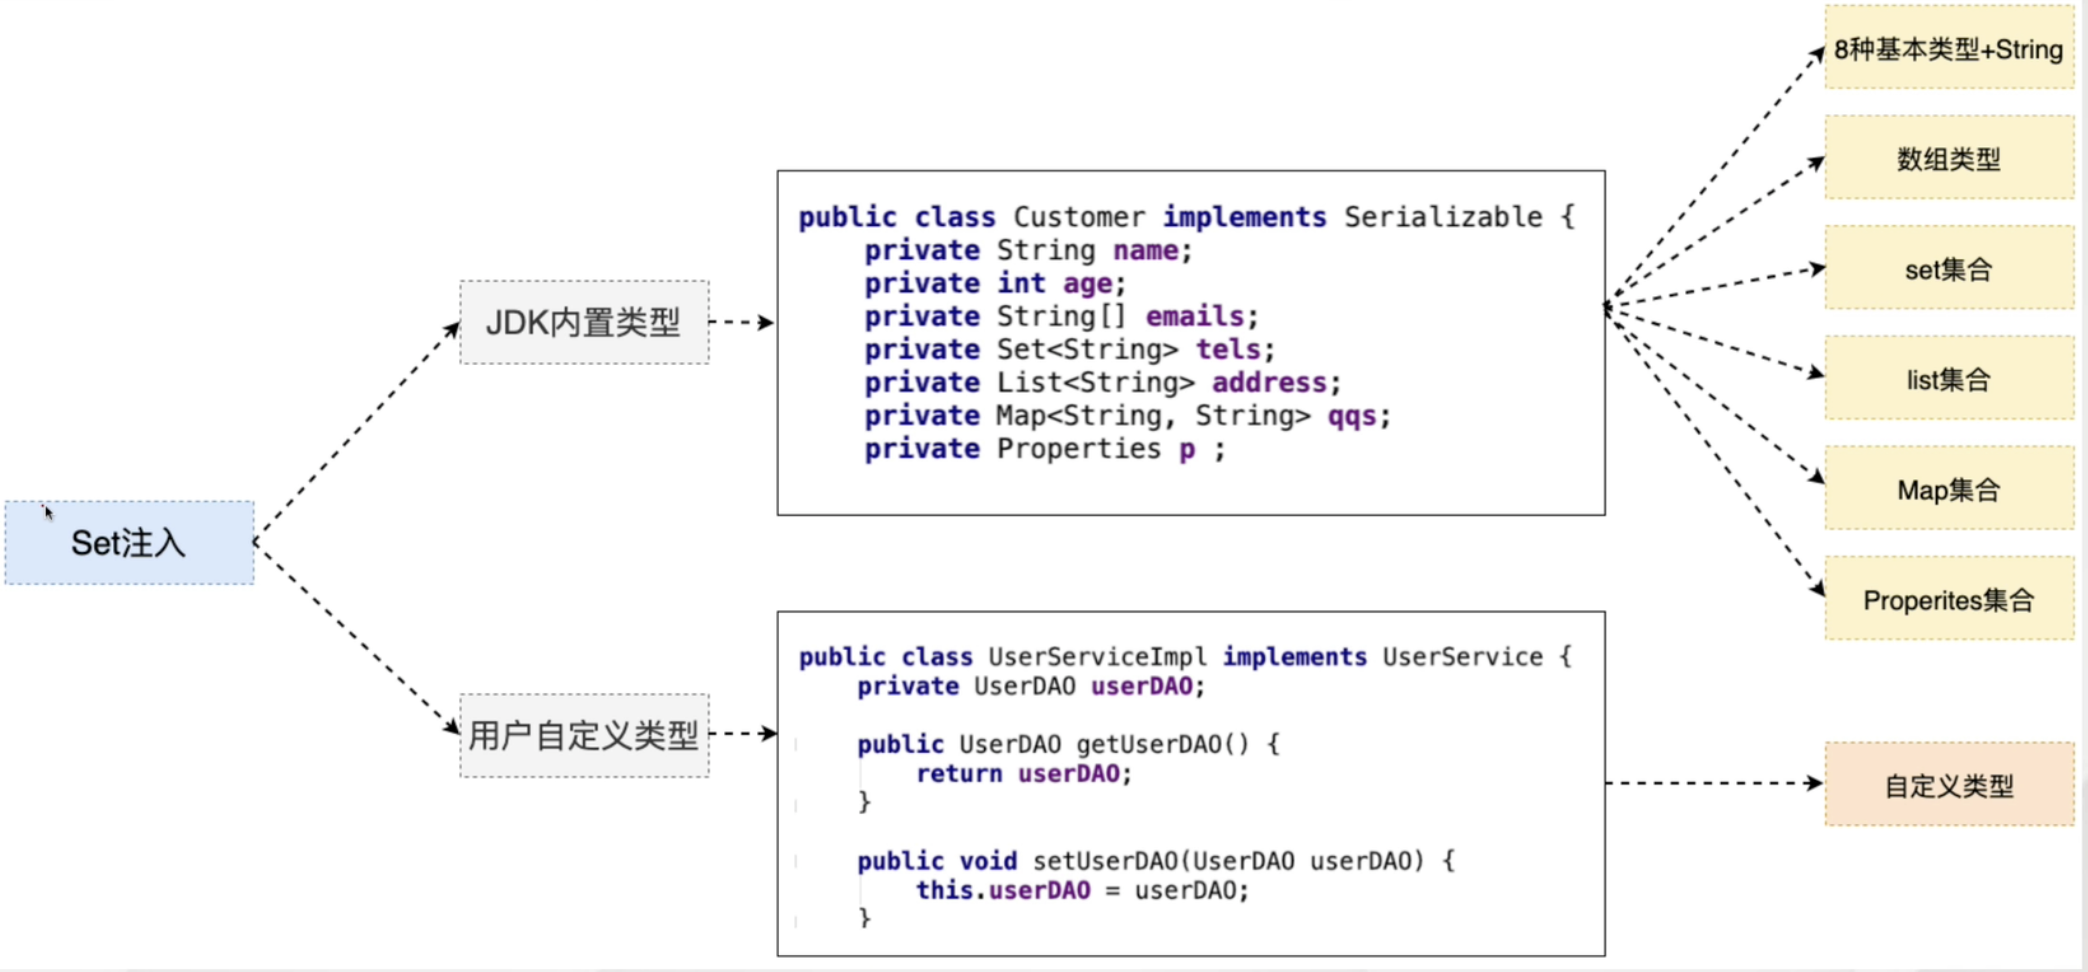
3、Set 注入
1、JDK 内置类型 String+8 种基本类型 数组 1 2 3 4 5 <array > <value > aa</value > <value > bbb</value > <value > ccc</value > </array >
Set 1 2 3 4 5 <set > <value > aa</value > <value > bbb</value > <value > ccc</value > </set >
List 1 2 3 4 5 <list > <value > aa</value > <value > bbb</value > <value > ccc</value > </list >
Map 1 2 3 4 5 6 7 8 9 10 11 12 13 <map > <entry key ="testA" > <value > lqs</value > </entry > <entry key ="testB" > <value > bbb</value > </entry > <entry > <key > <value > lqs</value > </key > <ref bean ="" /> </entry > </map >
Properties 1 2 3 4 5 <props > <prop key ="testC" > ccc</prop > <prop key ="testD" > ddd</prop > <prop > </prop > </props >
2、自定义类型 1 2 3 4 5 6 7 8 9 10 11 12 13 14 15 16 17 18 <bean id ="userService" class ="com.lqs.UserServiceImpl" > <property > <bean class ="com.lqs.UserDaoImpl" /> </property > </bean > <bean id ="userDao" class ="com.lqs.UserDaoImpl" > <property name ="name" > <value > lqs</value > </property > </bean > <bean id ="userService" class ="com.lqs.UserService" > <property name ="userDao" > <ref bean ="userDao" /> </property > </bean >
3、Set 注入的简化写法 基于属性简化 1 2 3 4 5 6 7 8 9 10 11 12 13 14 15 16 17 JDK类型注入<bean id ="userDao" class ="com.lqs.UserDaoImpl" > <property name ="name" value ="lqs" > </property > <property name ="name" > <value > lqs</value > </property > </bean > <bean id ="userService" class ="com.lqs.UserDaoImpl" > <property name ="name" ref ="userDao" /> <property name ="userDao" > <ref bean ="userDao" /> </property > </bean >
基于命名空间 p 简化 1 2 3 4 5 用p标签代替property<bean id ="person" class ="com.lqs.Person" p:name ="lqs" p:id ="100" /> <bean id ="userService" class ="com.lqs.UserService" p-userDao-ref ="userDao" />
4、构造注入 1 构造注入:Spring调用构造方法,通过配置文件为成员变量复制
1、使用方法 1 2 3 4 5 6 7 8 <bean id ="person" class ="com.lqs.Person" > <constructor-org > <value > 18</value > </constructor-org > <constructor-org > <value > lqs</value > </constructor-org > </bean >
2、构造方法重载 1、参数个数不同时 2、参数个数相同时 5、注入的总结 实战中使用 set 注入还是 get 注入?
答:set 注入更多
1、构造注入更麻烦
2、Spring 使用 set 注入更多
五、控制反转与依赖注入 1、控制反转(Inverse of Control) 对成员变量赋值的控制权发生变化:
从代码 —> spring 工厂和配置文件
解耦合
2、依赖注入 注入:通过 spring 工厂及配置文件,为对象成员变量赋值
依赖注入:当一个类需要另一个类时,就发生依赖,一旦出现以来,就把另一个类作为本类的成员变量,通过 Spring 注入
六、Spring 工厂创建复杂对象 简单对象:可以直接 new 创建的对象
复杂对象:不能通过 new 创建的,如 Connection、SqlSessionFactory
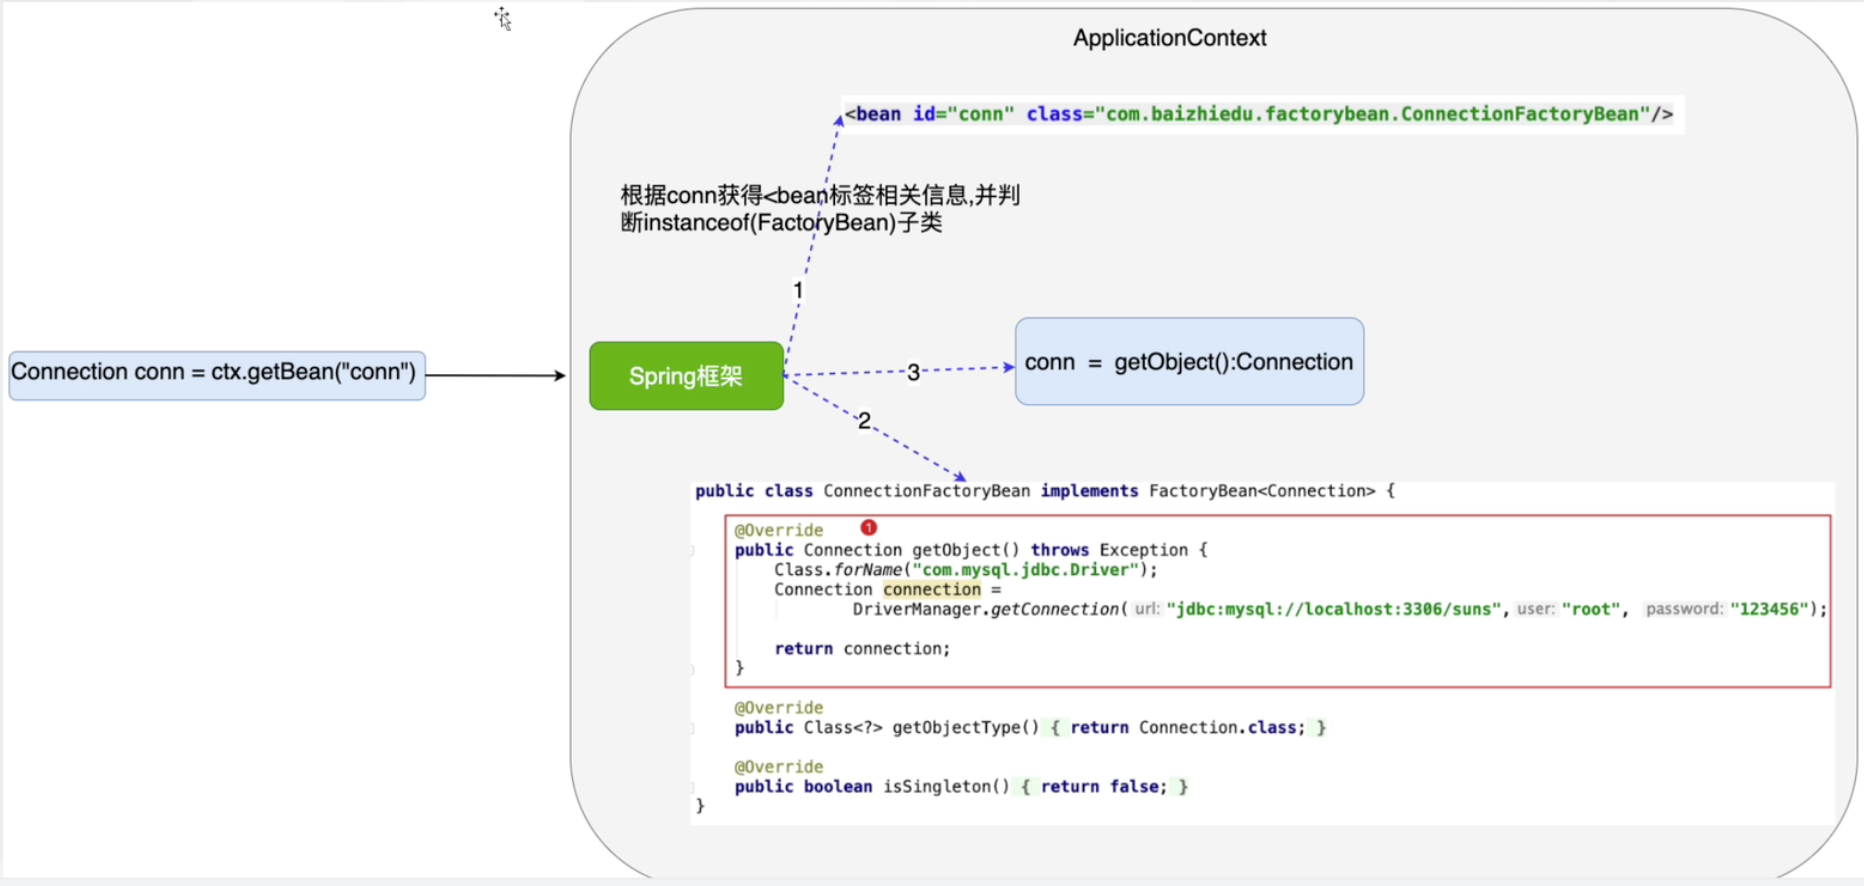
1、创建复杂对象的 3 种方式 1、Factory 接口 1 2 3 4 5 6 7 8 9 10 11 12 13 14 public class ConnectionFactory implements FactoryBean <Connection> {public Connection getObject () throws Exception {"com.mysql.cj.jdbc.Driver" );Connection con = DriverManager.getConnection(url,username,password);return con;public Class<?> getObjectType() {return Connection.class;public boolean isSingleton () {return false ;
1 2 # 当Class指定的是FactoryBean接口的实现类,那么通过id值获得的是这个类创建的是复杂对象con<bean id ="con" class ="com.lqs.ConnectionFactorybean" > </bean >
//加一个&获得
1 2 3 4 5
1 2 3 4 5 6 7 8 9 10 接口回调1. 为什么 Spring 规定 FactoryBean 接口并实现 getObject()2. ac.getBean("con")获得的是复杂对象 Connection 而不是 ConnectionFactoryBean(&)1. 通过 con 获得 ConnectionFactoryBean 类的对象,今儿通过 instance 判断出是 FactoryBean 的实现类2. 按照规定 getobject() --> Connection3. 返回 Object
1 Spring 用于创建复杂对象的一种方式,也是 Spring 原生提供的,后续讲解 Spring 整合其他框架会大量应用 FactoryBean
2、实例工厂 避免 Spring 框架的侵入
整合遗留系统
1 2 3 4 5 6 7 8 9 10 11 12 13 14 public class ConnectionFactory {public Connection getConnection () {Connection con = null ;try {"com.mysql.cj.jdbc.Driver" );"jdbc:mysql://localhost:3306/spring5" ,"root" ,"lxl20000413" );catch (SQLException e) {catch (ClassNotFoundException e) {return con;
1 2 <bean id ="connectionFactory" class ="com.lqs.basic.ConnectionFactory" /> <bean id ="con" factory-bean ="connectionFactory" factory-method ="getConnection" />
3、静态工厂 1 2 3 4 5 6 7 8 9 10 11 12 13 14 public class StaticConnectionFactory {public static Connection getConnection () {Connection con = null ;try {"com.mysql.cj.jdbc.Driver" );"jdbc:mysql://localhost:3306/spring5" ,"root" ,"lxl20000413" );catch (SQLException e) {catch (ClassNotFoundException e) {return con;
1 <bean id ="con" class ="com.lqs.basic.StaticConnectionFactory" factory-method ="getConnection" > </bean >
2、Spring 工厂模式总结
七、控制 Spring 工厂创建对象的次数 1、简单对象的创建次数 1 2 3 4 5 6 <bean id ="person" class ="com.lqs.Person" scope ="singleton" />
2、复杂对象创建次数 1 2 3 4 5 6 FactoryBean{return false /true ;多例/单例
3、为什么控制对象创建次数 节省不必要的内存浪费
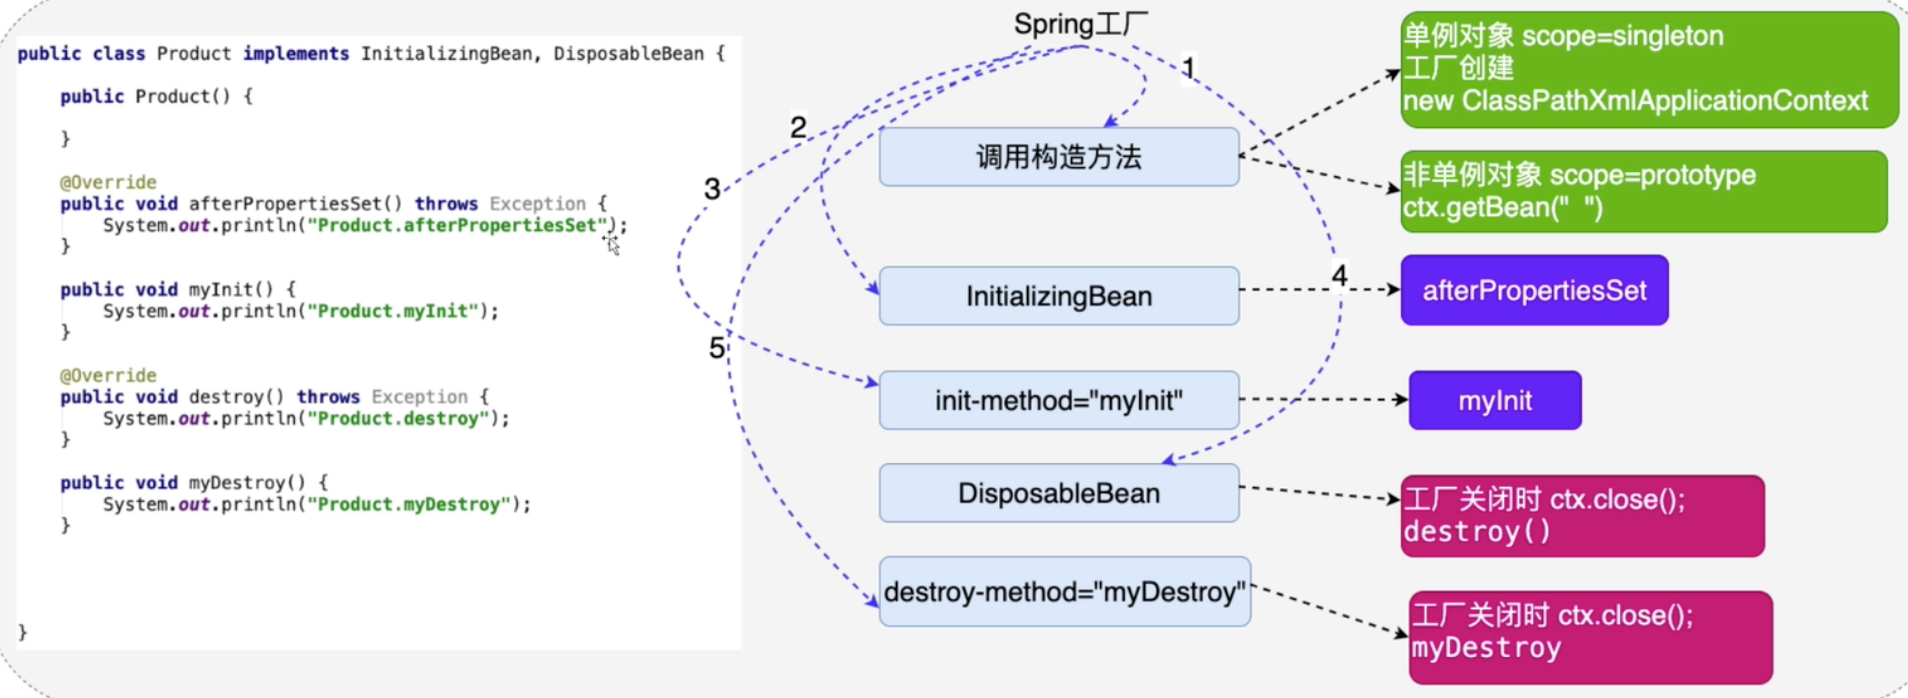
什么样的对象单例SqlSessionFactory Dao Service 什么样的对象多例 八、生命周期 对象创建、存活、消亡的完整过程
1、创建阶段 1 2 3 4 5 singleton
2、初始化阶段 spring 工厂创建完对象后,调用对象的初始化方法,完成对应的初始化操作
初始化方法:
1 public void afterPropertiesSet ()
1 2 public void myInit () ;"product" class="xxx.product" init-method="myInit" />
细节1、如果两种初始化方法同时出现,先 initializingBean 再普通方法 2、 注入发生在初始化操作之前 3、初始化:数据库、IO、网络 3、销毁阶段 销毁对象前,会调用销毁方法,完成销毁操作
Spring 什么时候销毁所创建的对象?
销毁方法:
1 2 public void myDestory () ;"product" class="xxx.product" destory-method="myDestory" />
细节1、销毁方法只适用于 singleton 2、销毁:主要是资源的释放 4、生命周期总结
九、自定义类型转换器 1、类型转换器 作用:Spring 使用类型转换器将配置文件中字符串数据转换为成员变量中对应类型的数据
2、自定义类型转换器 Spring 没有提供特类型转换时,需要自己自定义
1、实现 converter 接口、再自定义 1 2 3 4 5 6 7 8 9 10 11 12 13 14 15 public class MyDateConverter implements Converter <String, Date> {public Date convert (String s) {Date date = null ;try {SimpleDateFormat sdf = new SimpleDateFormat ("yyyy-MM-dd" );catch (ParseException e){return date;
2、在 spring 配置文件进行配置 1 2 3 4 5 6 7 8 9 10 11 <bean id ="mydateConverter" class ="xxx.MydateConverter" /> <bean id ="conversionService" class ="org.springframework.context.support.ConversionServiceFactoryBean" > <property name ="converters" > <set > <ref bean ="myDateConverter" /> </set > </property > </bean >
3、细节 转换器依赖于”yyyy-MM-dd”,可以将其单独配置。
做少量变动即可,其他不变,减少耦合
1 2 3 4 5 6 7 8 9 10 11 12 13 14 15 16 17 public class MyDateConverter implements Converter <String, Date> {private String pattern;public void setPattern (String pattern) {this .pattern = pattern;public Date convert (String s) {Date date = null ;try {SimpleDateFormat sdf = new SimpleDateFormat (pattern);catch (ParseException e){return date;
1 2 3 <bean id ="myDateConverter" class ="com.lqs.converter.MyDateConverter" > <property name ="pattern" value ="yyyy-MM-dd" /> </bean >
注册类型转换器时 id 属性不能变,必须是 conversionService 1 <bean id ="conversionService" class ="org.springframework.context.support.ConversionServiceFactoryBean" >
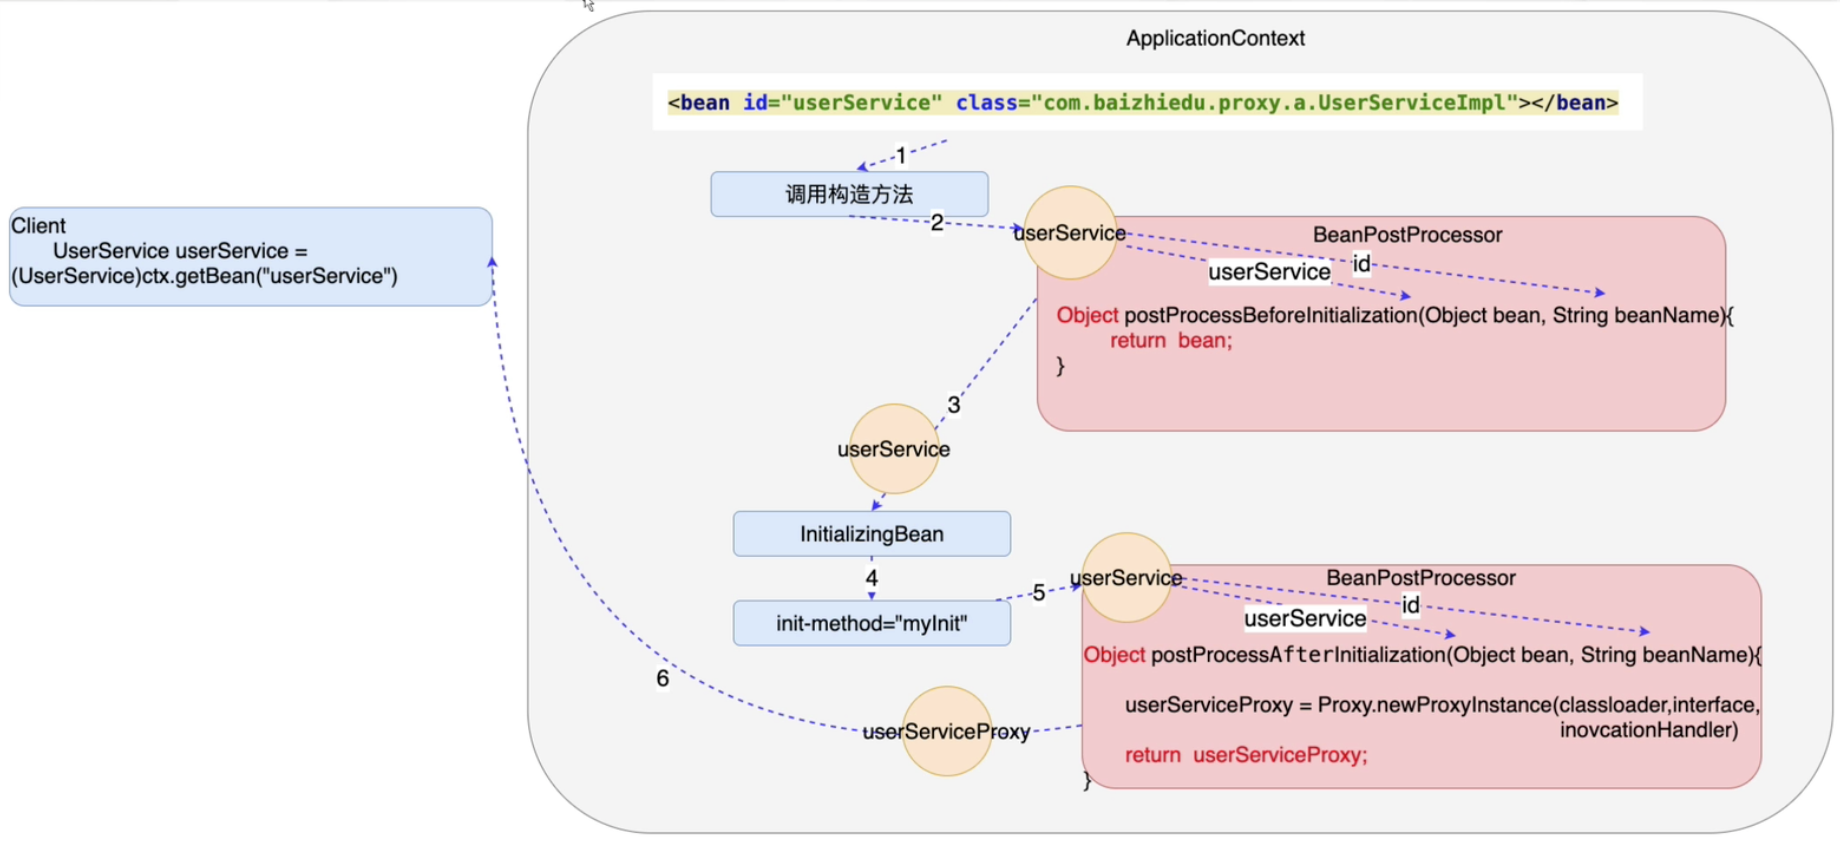
十、后置处理 Bean BeanpostProcessor 作用:对 Spring 工厂创建的对象再加工
1、实现 BeanPostProcessor 接口并配置进容器 1 2 3 4 5 6 7 8 9 10 11 12 13 14 15 16 @Bean public class MyBeanPostProcessor implements BeanPostProcessor {public Object postProcessBeforeInitialization (Object bean, String beanName) throws BeansException {return bean;public Object postProcessAfterInitialization (Object bean, String beanName) throws BeansException {if (bean instanceof Category) {Category category = (Category) bean;"sk" );return bean;
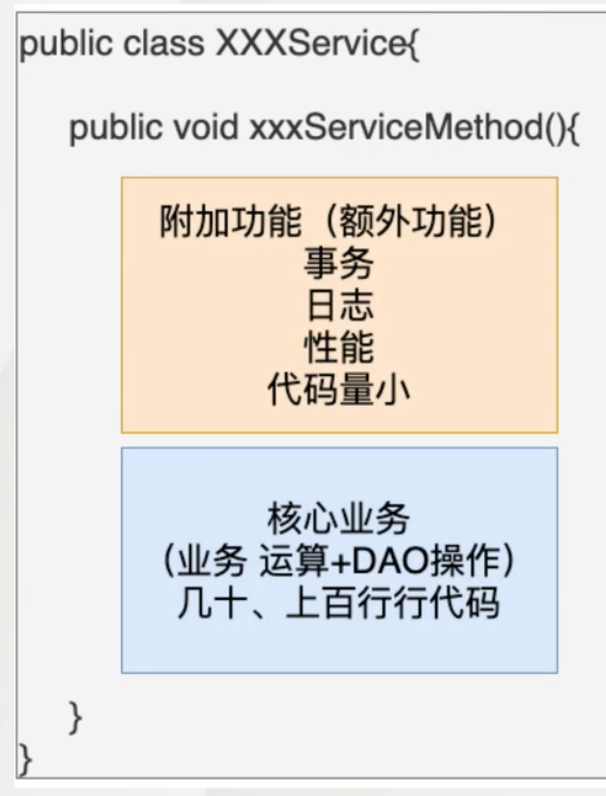
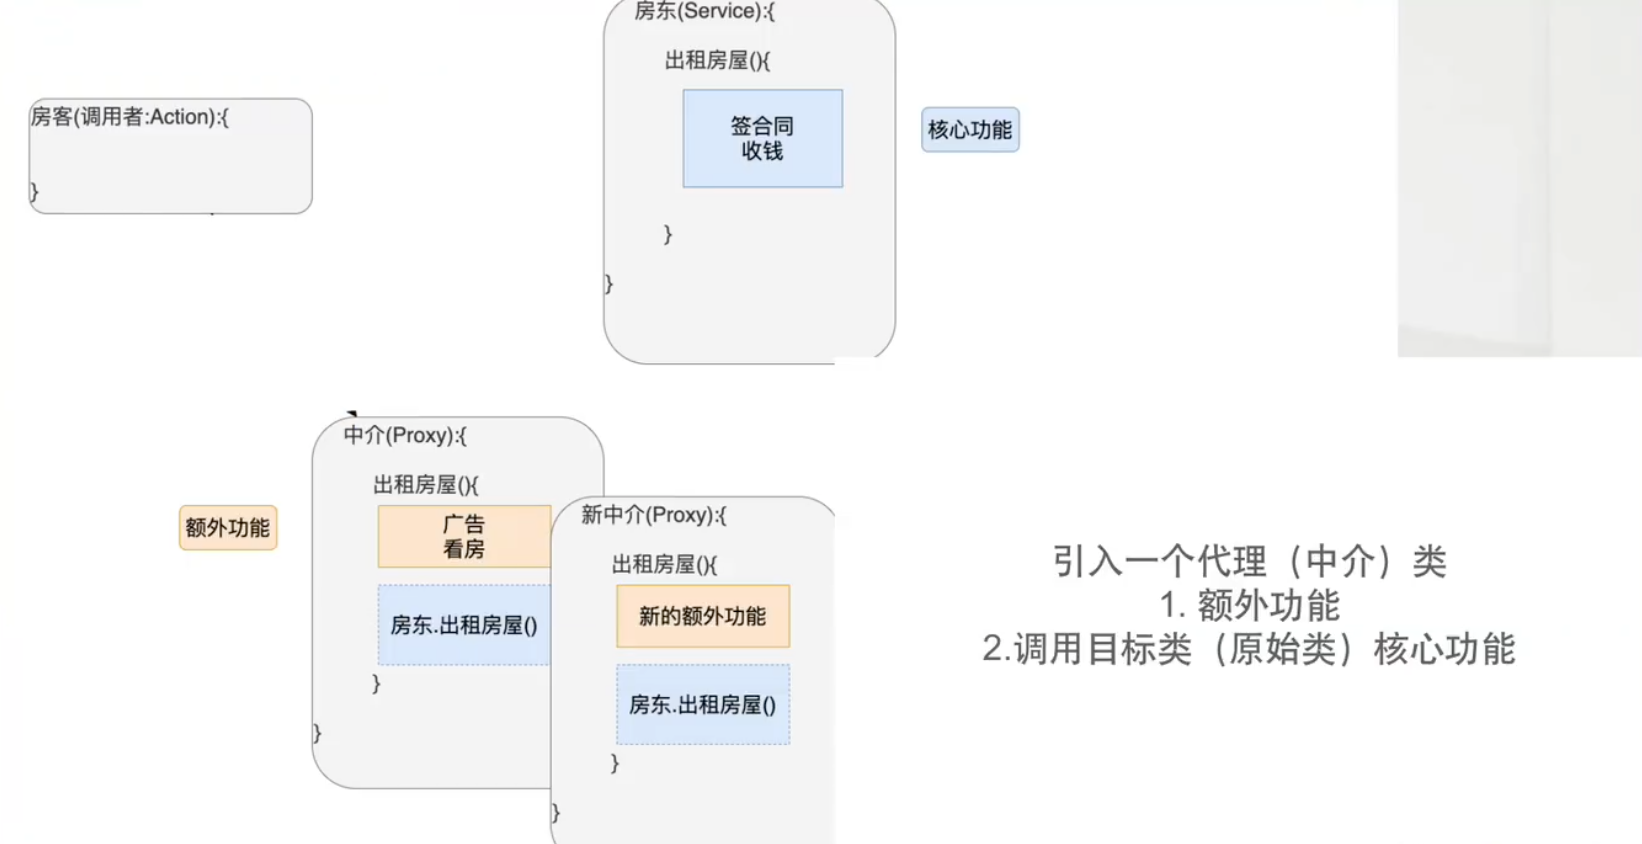
2、细节 BeanPostProcessor 会对工厂创建的所有的对象进行加工 ,所有针对特定嘞需要做特殊处理 十一、AOP 1、静态代理设计模式 dao service controller 三层架构中,service 层最重要
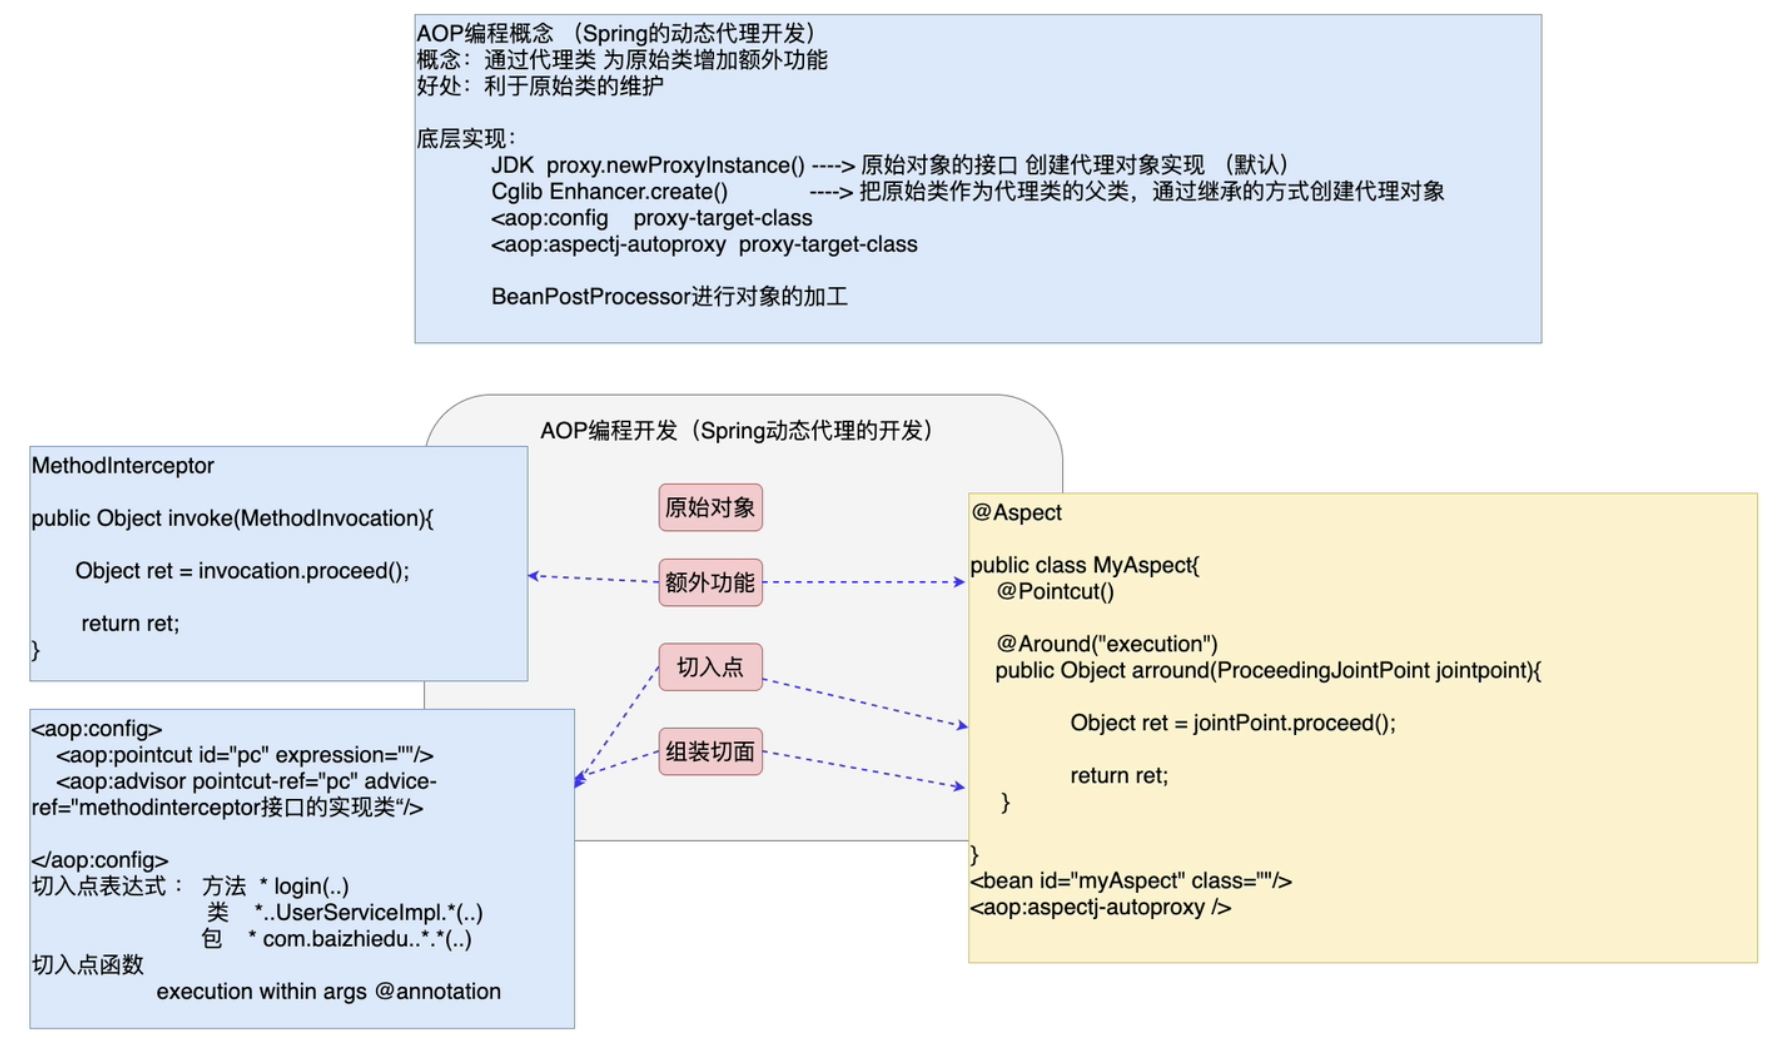
1、代理设计模式 定义:通过代理类为原始类增加额外功能,有利于原始类的维护
静态代理的问题:静态嘞文件数量过多,不利于项目管理 2、Spring 动态代理 通过代理类为被代理类实现功能增强,利于维护
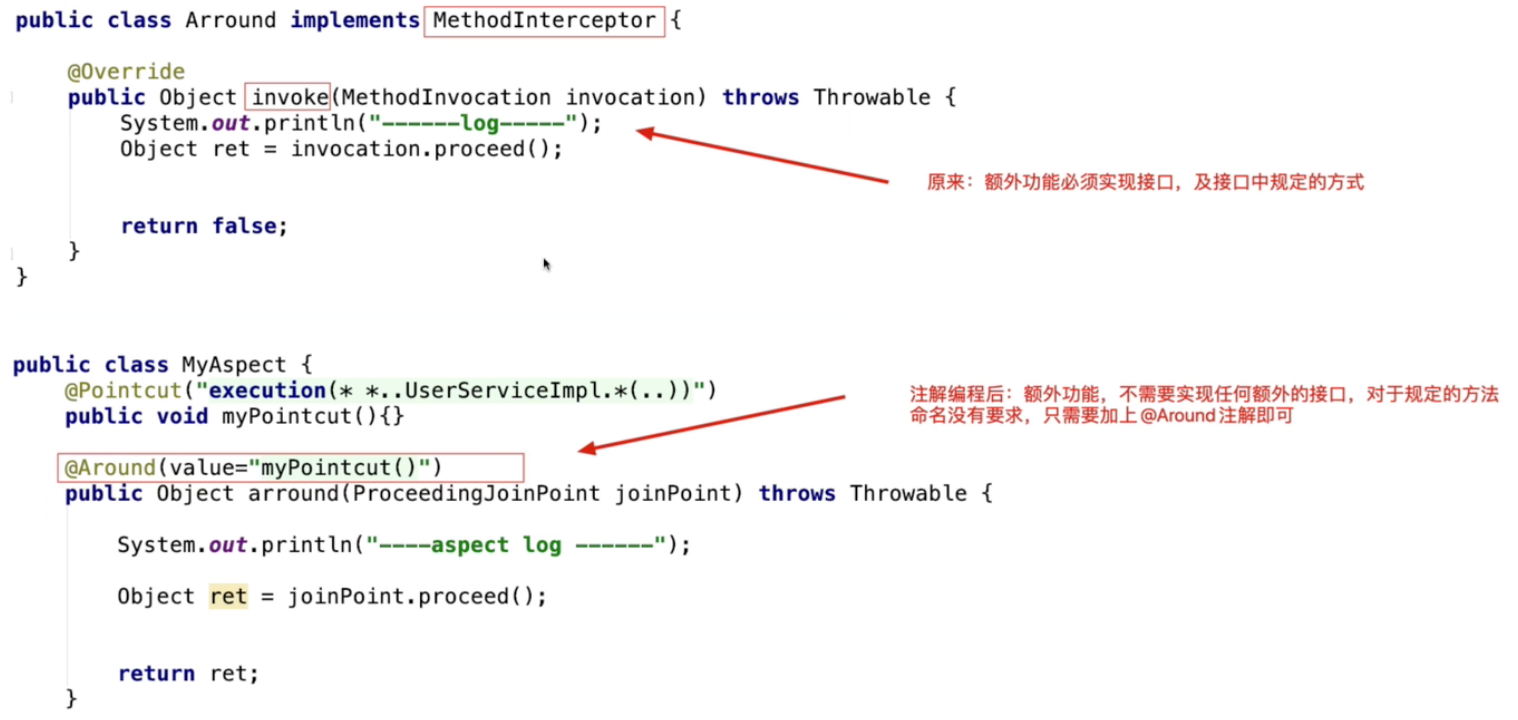
1、创建被代理类 1 2 3 4 5 6 7 8 9 10 11 12 13 14 15 16 public interface IUserService {public void register (User user) ;public boolean login (String name,String password) ;public class UserService implements IUserService {private UserService userService = new UserService ();public void register (User user) {"---log---" );public boolean login (String name, String password) {"---log---" );return userService.login(name, password);
2、创建类实现 MethodBeforeAdvice 1 2 3 4 5 6 7 public class Before implements MethodBeforeAdvice {public void before (Method method, Object[] objects, Object o) throws Throwable {"----method before advice log---" );"before" class="xx.Before" /
3、定义切入点 额外功能加入的位置
1 2 3 4 <aop:config > <aop:pointcut id ="pc" expression ="execution(* *(..))" /> </aop:config >
4、组装 1 2 3 4 5 6 <aop:config > <aop:pointcut id ="pc" expression ="execution(* *(..))" /> <aop:advisor advice-ref ="before" pointcut-ref ="pc" /> </aop:config >
5、调用 注意:
spring 工厂通过原始对象 id 获取到的是代理对象
获得代理对象之后,可以通过声明接口类型进行对象的存储
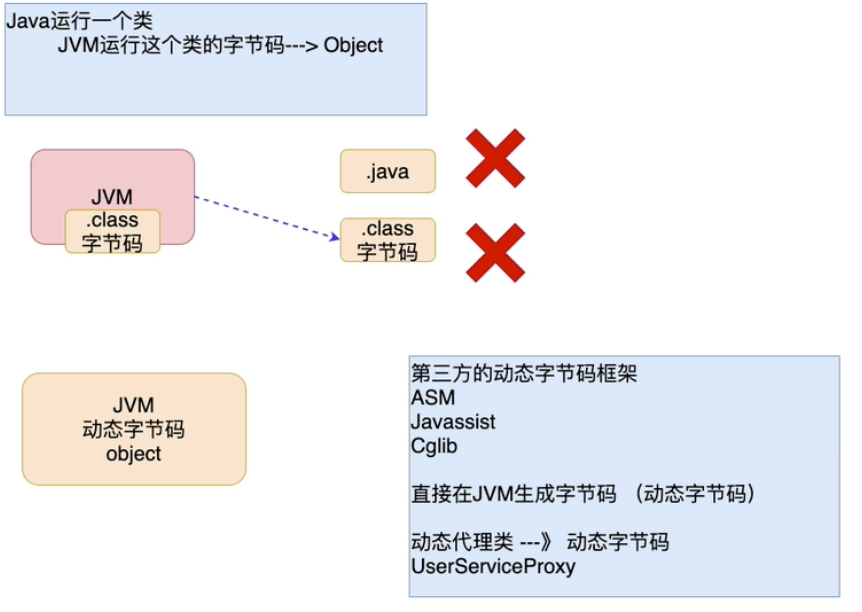
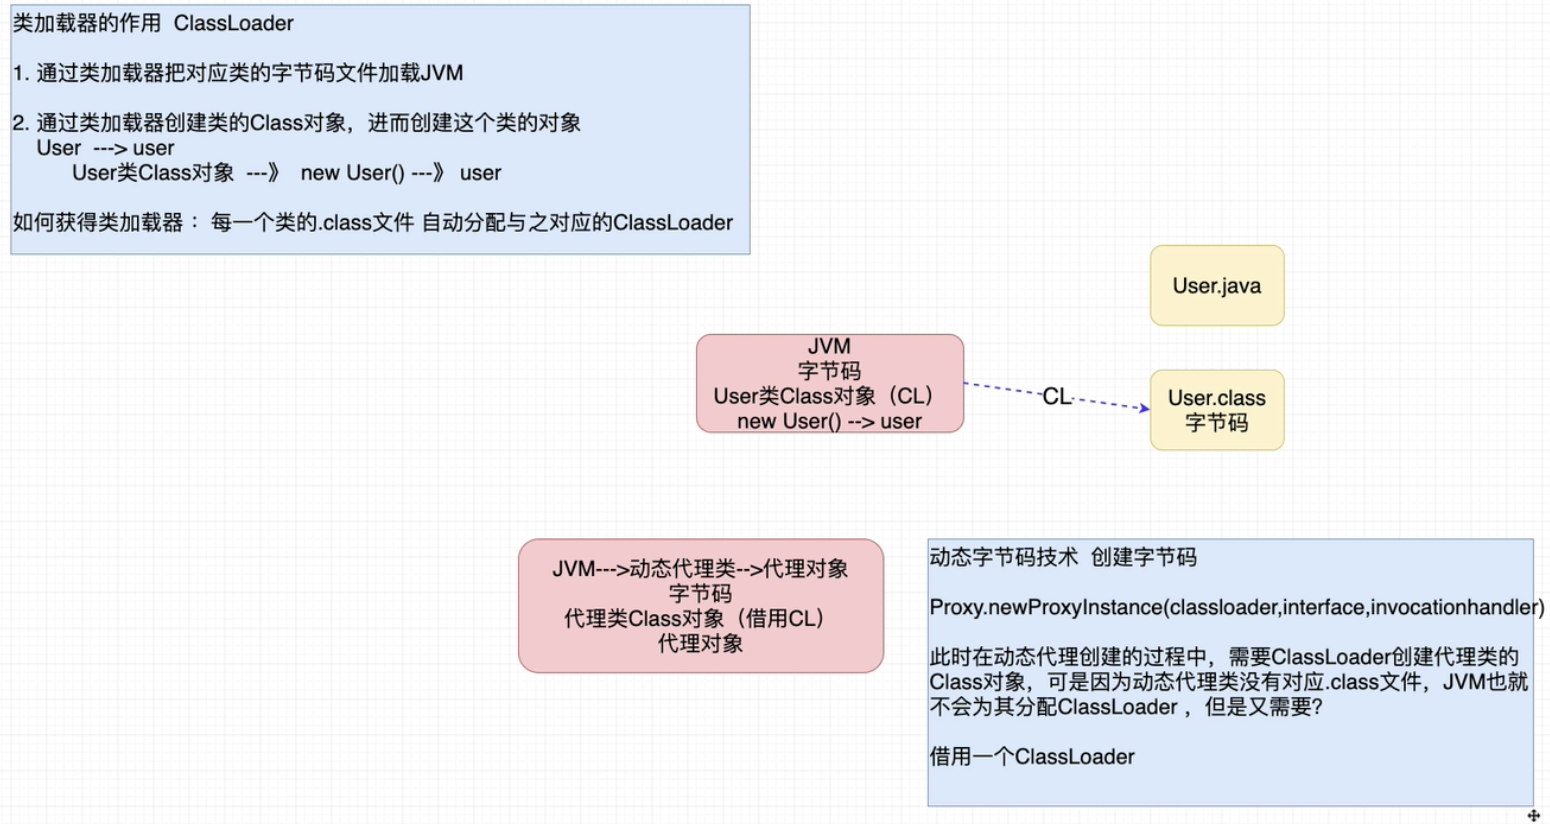
3、动态代理细节分析 Spring 框架运行时,通过动态字节码技术,在 JVM 创建 Spring 动态代理类,运行在 JVM 内部
1 在额外功能不改变的前提下,创建其他目标类的代理对象时,只需要指定原始对象即可
4、Spring 动态代理详解 1、额外功能详解 1 MethodBeforeAdvice:在原始方法执行之前的增强需要实现此接口
1 2 3 4 5 6 7 8 9 10 11 12 13 14 15 16 17 18 19 20 21 22 23 24 MethodInterceptor:对原始方法进行环绕增强public class Around implements MethodInterceptor {public Object invoke (MethodInvocation methodInvocation) throws Throwable {Object ret = null ;"前置通知" );try {"前通知" );"后置通知" );catch (Exception e){"异常通知" );finally {"最终通知" );return ret;
2、切入点表达式 定义一个方法
访问修饰符 返回值 方法名 参数列表 public void service String,Integer
定义切入点表达式不需要管返回值
非 java.lang 包中的类需要写全限定类名
方法切入点表达式 1 2
类切入点表达式 1 2 3 4 5 6 7
包切入点表达式(最常用) 指定包作为额外功能加入的位置,自然保重所有类及方法都会加入额外的功能 1 2 3 4
切入点函数 execution最重要的切入点函数 切入点:可执行上述三种切入点表达式 缺点:书写麻烦 args用于函数参数的匹配 切入点:方法参数必须时 2 个字符串类型的参数 eg:execution(_ _(String,String)) == args(String,String) within用于进行类,包切入点表达式的匹配 切入点:类 eg:execution(_ ..userService. (..)). == within(_..userService) @annotation 切入点函数的逻辑运算整合多个切入点函数配合工作,进而完成复杂的需求 and 与操作注意:不能用于同类型的切入点函数 eg:execution(_ login(_ )) and args(String,String) == execution( login(String,String)) or 或操作eg:execution(_ login(..)) or execution(_ register(..)) 5、AOP 编程
1、基于 Cglib 1 2 3 4 5 6 7 8 public static void main (final String[] args) {UserService cglibService = (UserService) Enhancer.create(userService.getClass(), new MethodInterceptor () {public Object intercept (Object o, Method method, Object[] objects, MethodProxy methodProxy) throws Throwable {"---cglib---proxy" );return method.invoke(userService, objects);}});new User ());
2、基于 JDK 1 2 3 4 5 6 7 8 9 10 11 12 13 14 15 16 17 public static void main (String[] args) {IUserService userService = new UserService ();IUserService proxyService = (IUserService) Proxy.newProxyInstance(userService.getClass().getClassLoader(), userService.getClass().getInterfaces(), new InvocationHandler () {@Override public Object invoke (Object proxy, Method method, Object[] args) throws Throwable {"----before" );Object ret = method.invoke(userService, args);"----after" );return ret;"lqs" ,"qejaldms" );
十二、基于注解的 AOP 1、简单使用 1 2 3 4 5 6 7 8 9 10 11 12 13 14 15 16 17 18 public class UserService {public void register (User user) {"---log---" );public boolean login (String name, String password) {"---log---" );return true ;}@Aspect public class MyAspect {@Around("execution(* login(..))") public Object around (ProceedingJoinPoint joinPoint) throws Throwable {"aspect---before" );Object ret = joinPoint.proceed();"aspect---after" );return ret;
1 2 3 4 5 6 <aop:aspectj-autoproxy /> <bean id ="userService" class ="com.lqs.aspect.UserService" /> <bean id ="myAspect" class ="com.lqs.aspect.MyAspect" />
2、细节 1 2 3 4 5 6 7 8 9 10 11 12 13 14 @Aspect public class MyAspect {@Pointcut("execution(* register(..))") public void myPointCut () {}@Around(value = "myPointCut()") public Object around2 (ProceedingJoinPoint joinPoint) throws Throwable {"aspect---before tx" );Object ret = joinPoint.proceed();"aspect---after tx" );return ret;
spring 对 jdkproxy 和 cglib 的切换 1 2 3 4 //false:默认值,即使用jdkproxy<aop:aspectj-autoproxy proxy-target-class ="false" /> //基于注解的<aop:aconfig proxy-target-class ="false" > //基于配置的
3、开发常见的坑 在同一个业务类中进行方法间的相互调用,只有最外层方法才进行方法增强(内部方法通过普通调用的都是未增强的方法) 1 2 3 4 5 6 7 8 9 10 11 12 public class UserService {public void register (User user) {"---register---" );this .login("suns" , "qkdokd" );public boolean login (String name, String password) {"---login---" );return true ;
解决方法:通过实现 ApplicationContextAware 获得 applicationContext,再创建 1 2 3 4 5 6 7 8 9 10 11 12 13 14 15 16 17 18 19 20 21 22 23 24 25 26 27 28 public class UserService implements IUserService , ApplicationContextAware {private ApplicationContext ctx;@Override public void setApplicationContext (ApplicationContext applicationContext) throws BeansException {this .ctx = applicationContext;public void register (User user) {"---register---" );UserService userService = (UserService)ctx.getBean("userService" );"suns" , "qkdokd" );public boolean login (String name, String password) {"---login---" );return true ;
4、AOP 总结
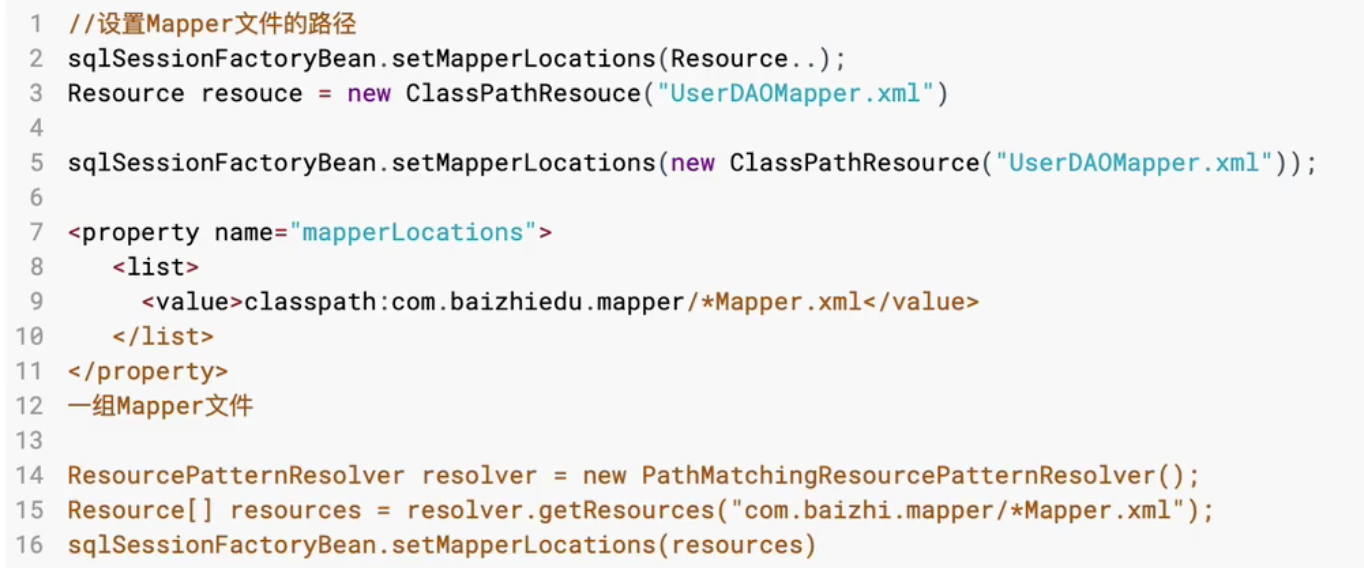
十三、Spring 整合 Mybatis 1、Spring 整合 Mybatis 1 2 3 4 5 6 7 8 9 10 11 12 13 14 15 16 17 18 19 20 21 22 23 24 25 26 27 28 <bean id ="dataSource" class ="com.alibaba.druid.pool.DruidDataSource" > <property name ="driverClassName" value ="${mysql.driver}" /> <property name ="url" value ="${mysql.url}" /> <property name ="username" value ="${mysql.user}" /> <property name ="password" value ="${mysql.password}" /> </bean > <bean id ="sqlSessionFactory" class ="org.mybatis.spring.SqlSessionFactoryBean" > <property name ="dataSource" ref ="dataSource" /> <property name ="configLocation" value ="classpath:mybatis-config.xml" /> <property name ="mapperLocations" value ="classpath:mapper/*.xml" /> <property name ="typeAliasesPackage" value ="com.blog.pojo" /> </bean > <bean class ="org.mybatis.spring.mapper.MapperScannerConfigurer" > <property name ="sqlSessionFactoryBeanName" value ="sqlSessionFactory" /> <property name ="basePackage" value ="com.blog.mapper" /> </bean >
1 2 3 4 1. 实体2. DAO 接口3. Mapper 配置文件
2、整合细节 为什么 dao 不提交事务,但是数据可以插入进数据库 ? 1 spring 整合 mybatis 时,引入了外部连接池对象,保持自动的事务提交机制,不需要手工进行事务的操作,也能进行事务提交
十四、Spring 事务处理 1、Spring 事务处理 保证业务操作完整性的一种数据库机制
事务 4 特点:A 原子性、C 一致性、I 隔离性、D 持久性
2、事务属性 1、隔离属性 并发:多个事务在统一时间,访问并操作了相同的数据
并发产生的问题
脏读:一个事务读取另一个事务没有提交的数据,会在本事务产生数据不一致的问题 幻读: 不可重复读 如何解决:通过隔离属性解决,隔离属性设置不同的值
脏读:@Transactional(isolation = Isolation.READ_COMMITTED)脏读 不可重复读 幻读 ORACLE 支持 MYSQL 支持 一个事务读取另一个事务没有提交的数据,会在本事务产生数据不一致的问题 同一个事务中,多次读取到的数据不一致 一个事务读取数据时,另外一个事务进行更新,导致第一个事务读取到了没有更新的数据 READ_UNCOMMITTED Y Y Y Y Y READ_COMMITTED N Y Y Y(Default) Y REPEATABLE_READ:一把行锁 N N Y N Y(Default) SERIALIZABLE:表锁 N N N Y Y
并发安全:从上到下递增(除开 READ_UNCOMMITTED)
运行效率:从上到下递减(除开 READ_UNCOMMITTED)
ORACLE 使用多版本比对的方式,解决不可重复读的问题
ISOLATION_DEFAULT:调用不同数据库设置的默认隔离属性
1 select @@transaction _isolation;
1 2 3 4 5 6 7 8 SELECT s.sid, s.serial#,CASE BITAND(t.flag, POWER (2 , 28 ))WHEN 0 THEN 'READ COMMITTED' ELSE 'SERIALIZABLE' END AS isolation_levelFROM v$transaction tJOIN v$session s ON t.addr = s.taddr AND s.sid = sys_context('USERENV' , 'SID' );
隔离属性实战建议推荐使用指定默认值 实战中并发比较少,真正遇到并发问题,可以使用乐观锁 2、传播属性 事务解决嵌套问题的特征
问题:大事务中有很多小事务,彼此影响,最终导致外部大事务丧失事务原子性
传播属性的值 外部不存在事务 外部存在事务 备注 REQUIRED(default) 开启新的事务 融合到外部事务中 增删改方法 SUPPORTS 不开启新的事务 融合到外部事务中 查询 REQUIRES_NEW 开启新的事务 挂起外部事务,创建新事务,执行完之后再执行外部事务 日志记录方法 NOT_SUPPORTED 不开启新的事务 挂起外部事务 不常用 NEVER 不开启新的事务 抛出异常 不常用 MANDATORY 抛出异常 融合到外部事务中 不常用
1 @Transactional =Propagation.REQUIRED
3、只读属性 针对只进行查询操作的业务方法,可以加入只读属性,提高运行效率
默认值为 false
4、超时属性 指定事务等待的最长时间
为什么事务进行等待?
答:事务访问数据时,如果有其他事务正在操作事务,此时需要等待
1 @Transactional =(timeout=2 )
5、异常属性 Spring 事务处理过程中,默认异常处理
RuntimeException: 回滚
Exception 及其子类:提交
1 2 @Transactional(rollbackFor = {java.lang.Exception, xxx, xxx})
3、事务属性总结 1 2 3 4 5 6 7 8 1. 隔离属性 默认值2. 传播属性 Required(默认值) 增删改 Supports 查询操作3. 只读属性 false(默认值) 增删改 true 查询操作4. 超时属性 -15. 异常属性 默认值
4、基于标签的事务配置方式 1 2 3 4 5 6 7 8 9 10 11 12 13 14 15 16 17 18 <tx:advice id ="texAdvice" transaction-manager ="dataSourceTransactionManager" > <tx:attributes > <tx:method name ="register" isolation ="" propagation ="" /> <tx:method name ="login" isolation ="" propagation ="" /> <tx:method name ="modify*" isolation ="" propagation ="" /> </tx:method > </tx:attributes > </tx:advice > <aop:config > <aop:pointcut id ="pc" expression ="execution(* com.lqs.service..*.*(..))" /> <aop:advisor advice-ref ="txAdvice" pointcut-ref ="pc" /> </aop:config >
十五、Spring 整合 mvc 1、Spring 整合 MVC 核心思路 1、准备工厂 1 2 3 4 5 6 7 8 9 10 11 12 13 14 15 1. web 开发如何创建工厂2. 如何保证工厂唯一同时被使用3. 总结4. spring 整合一个 contextLoaderListener
1 2 3 4 5 6 7 8 9 10 11 12 13 14 15 16 17 18 19 20 21 22 23 try {if (this .context == null ) {this .context = createWebApplicationContext(servletContext);if (this .context instanceof ConfigurableWebApplicationContext) {ConfigurableWebApplicationContext cwac = (ConfigurableWebApplicationContext) this .context;if (!cwac.isActive()) {if (cwac.getParent() == null ) {ApplicationContext parent = loadParentContext(servletContext);this .context);
1 2 3 4 5 6 7 8 9 10 11 <listener > <listener-class > org.springframework.web.context.ContextLoaderListener</listener-class > </listener > <context-param > <param-name > contextConfigLocation</param-name > <param-value > classpath:applicationContext.xml</param-value > </context-param >
十六、注解开发 注解的作用
替换 xml 配置,简化配置
替换接口,实现调用双方的契约性质
对已添加的注解不满意,可以通过配置文件进行覆盖
1、对象创建注解 1 2 <context:component-scan base-package ="com.lqs" />
1 2 3 4 5 6 7 8 作用:替换原有 spring 配置文件的<bean >
@Scope @PostConstruct:初始化 @Lazy 2、注入相关注解 1 2 3 4 5 6 - 基于类型注入:注入对象类型必须与目标成员变量相同或者其子类- 配合@Qualifier("id")- 放置位置
1 2 3 - JSR250 提供的- 基于名字进行注入- 如果名字没有配对成功,会继续按照类型进行注入
@Inject(了解即可) 1 2 3 4 5 6 - 与@Autowired 完全一致,需要引入 jar 才可以使用<dependency > <groupId > </groupId > <artifactId > </artifactId > <version > </version > </dependency >
1 2 3 4 5 6 7 8 9 10 11 12 - 作用:注入 jdk 基本类型- 1、设置 xxx.properties- 2、spring 引入配置文件<context:property-placeholder location ="xxx.properties" - 3 、使用 @Value ("id ") private int id ; - 注意 : - 不能用在静态变量上 - 不能给集合类型注入 (只能用 XML 配置 ,新格式 YML 可以注入 )
1 2 - 替换下面<context:property-placeholder location ="xxx.properties"
3、注解扫描详解 1 2 <context:component-scan: base-package=""/>
1、排除方式 1 2 3 4 5 6 7 8 9 10 11 12 13 <context:exclude-filter type ="" expression ="" />
2、包含方式 1 2 3 4 5 6 7 8 9 10 11 12 <context:include-filter type ="" expression ="" />
4、注解开发思考 5、高级注解 替代 xml 配置中标签
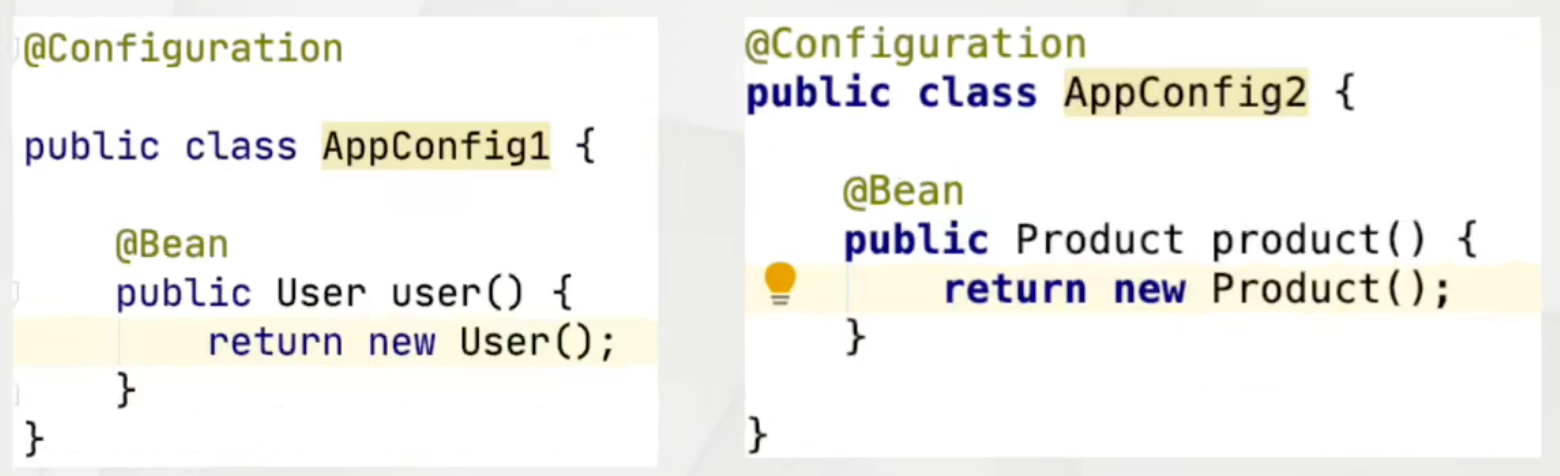
1 2 3 4 5 6 7 8 9 10 11 12 13 14 15 16 17 18 19 20 21 22 23 24 25 26 27 28 29 30 31 32 33 34 1. 创建复杂对象时public class ConnectionFactoryBean implements FactoryBean <Connection>{public Connection getObject () throws Exception {"com.mysql.jdbc.Driver" );Connection con = DriverManager.getConnection(url, user, password);return con;public Class<?> getObjectType(){return Connection.class;public boolean isSingleton () {return false @Configuration public class AppConfig {@Bean("connection") @Scope("singleton | prototype") public Connection conn () {Connection conn = null ;try {ConnectionFactoryBean factory = new ConnectionFactoryBean ();catch (Exception e){return conn;
1 2 3 4 5 6 7 8 9 10 11 12 13 14 15 16 17 18 19 20 21 22 23 24 2. 自定义类型注入@Bean public UserDao userDao () {return new UserDaoImpl ();@Bean public UserService userService (UserDao userDao) {UserService userService = new UserServiceImpl ();return userService;@Bean public UserDao userDao () {return new UserDaoImpl ();@Bean public UserService userService (UserDao userDao) {UserService userService = new UserServiceImpl ();return userService;
1 底层通过cglib进行功能增强:如单例/多例模式
代替 xml 配置形式
1 2 3 4 5 6 7 8 @Configuration class AppConfig {}ApplicationContext ac = new AnnotationConfigApplicationContext (AppConfig.class)ApplicationContext ac = new AnnotationConfigApplicationContext ("com.lqs.config" )
1 2 3 基于注解开发,不能集成 Log4j,使用 logback
代替<context:component-scan base-package=””/>
1 2 3 4 5 6 7 8 9 10 11 12 13 14 @Configuration @ComponentScan(basePackages = "com.lqs" useDefaultFilters = false//默认为true,可扫描@Component、@Repository、@Service 和 @Controller 标注的类 excludefilters = { //排除类型,可叠加使用,一共5种,参考标签形式 //不扫描Service注解 @ComponentScan.Filter(type = Filter.ANNOTATION, value = {Service.class}) @ComponentScan.Filter(type = Filter.ASPECTJ, pattern = {"com.lqs..*"}) @ComponentScan.Filter(type = Filter.ASSIGNABLE_TYPE, value = {}) @ComponentScan.Filter(type = Filter.REGEX, pattern = {}) @ComponentScan.Filter(type = Filter.CUSTOM, value = {}) })
6、多配置方式 1 bean 标签 > @Bean > @Component 及衍生注解,可以进行覆盖
7、整合多个配置信息 
1 等价于<import resource ="" />
在工厂创建时,指定多个配置 Bean 的 class 对象(了解即可)
1 2 3 4 5 6 7 8 9 10 11 12 13 14 15 16 17 18 19 20 21 22 23 24 25 26 @Configuration @Import(AppConfig2.class) @ImportResouce("application.xml") public class AppConfig1 {@Autowired private UserDao userDao;@Bean public userService userService () {UserService userService = new UserService ();return userService;@Configuration public class AppConfig2 {@Bean public userService userService () {return new UserDao ();"user2" class="com.lqs.User2" />
8、四维一体开发思想 基于 schema
基于特定功能注解
基于原始
基于@Bean 注解
1 2 3 4 5 6 例子:1. <context:property-placeholder /> 2. @PropertySource3. <Bean id ="" class ="" /> 4. @Bean
9、纯注解 AOP 1 2 3 4 5 6 7 8 9 10 11 12 13 @Aspect public class MyAspect {@Around("execution(* login(..))") public Object around (ProceedingJoinPoint jointpoint) throws Throwable{"---around-log" );Object ret = jointPoint.proceed();return ret;@EnableAspectjAutoProxy
1 2 3 4 5 6 7 8 9 10 11 12 13 14 15 16 17 18 19 20 21 22 1. 代理创建方式的切换:JDK Cglibtrue | false />@EnableAspectjAutoProxy(proxyTargetClass) 2. SpringBoot AOP开发方式@EnableAspectjAutoProxy 已经配置好了1 、原始对象@Service public class UserService implements IUserService (){2 、创建切面类@Aspect @Component public class MyAspect {@Around("execution(* login(..))") public Object around (ProceedingJoinPoint jointpoint) throws Throwable{"---around-log" );Object ret = jointPoint.proceed();return ret;
10、Mybatis 纯注解
11、纯注解事务编程 1 2 3 4 5 6 7 8 9 10 11 12 13 14 15 16 1. 原始对象 XXXService"userService" class="com.lqs.service.UserService" >"userDao" ref="userDao" />2. 额外功能"org.springframe.jdbc.dataSource.DataSourceTransactionManager" "dataSourceTransactional" >"dataSource" ref="dataSource" />3. 事务属性@Transactional public class UserService implements IUserService {private UserDao userDao;4. 基于schema的事务配置"dataSourceTransactionManager"
十七、Spring 使用 YML YML(YAML)是一种新形式的配置文件,比 XML 简单,比 properties 更强大
properties 缺点:
过于繁琐,无法表达内在联系
无法表达对象、集合类型
1、语法简介 1 2 3 4 5 6 7 8 9 10 11 12 name: lqs password: 123456 user: id: 1 name: lqs address: wuhan service: - 111 - 222
2、Spring 整合 YML 1 2 3 4 5 6 7 8 9 1. 准备配置文件 xxx.yml2. 读取 yml 转换成 properties3. 应用 propertySourcePlaceholderConfigurer
3、Spring 与 YML 集成编码 1 2 3 4 5 <dependency > <groupId > org.yml</groupId > <artifactId > snakeyaml</artifactId > <version > 1.23</version > </dependency >
1 2 3 4 5 6 7 8 9 10 11 12 13 14 15 16 17 18 2. 配置bean完成yml读取与PropertySourcePlacrholderConfigurer的创建@Configuration @ComponentScan(basePackages = "com.lqs.yml") public class YmlAutoConfiguration {@Bean public PropertySourcePlacrholderConfigurer configure () {YamlPropertySourceFactoryBean ymlbean = new YamlPropertySourceFactoryBean ();new ClassPathResource ("xxx.yml" ))Properties properties = yamlPropertiesFactoryBean.getObject();PropertySourcePlacrholderConfigurer configurer = new PropertySourcePlacrholderConfigurer ();return configurer;3. 类加入@Value 注解@Value("${account.name}") private String name;
4、注意的问题 1 2 3 4 5 6 7 8 9 10 11 12 13 14 15 16 17 list: 111 ,2222 @Value("#{'${list}'.split(',')}") account: name: lqs age: 18 @Value("${account.name}") private String name; @Value("${account.age}"); private int age;